This is not as physically difficult as it sounds. Sure, the horse has a huge back-end, but the technique is all speed and leverage, which is why smaller people can adjust horses.
I know of four methods to effectively adjust the horse's pelvis to restore normal joint and muscle function. I'll discuss one of them.
The Sacroiliac Joint
This horse's sacrum acts as a sturdy platform for its huge pelvis. There is not a lot of room for movement within the sacroiliac (SI) joint itself. In fact, after the age of 10, the SI joints in most horses are fused. So the question is, if the SI joints are fused, how can one expect to restore normal joint function there?
You have to look at this a little differently than you would a person's SI joint. Think "muscle dysfunction" in this area, as opposed to joint dysfunction. Since the horse's back legs and pelvis are responsible for its power and propulsion during running, a once fast horse that is now slow usually suffers from tight and spastic pelvic, lumbar, and hind leg (hamstring) muscles. The idea of pushing into the horse's pelvis through the plane line of the SI joint is to free up large muscle attachments all at once by contacting the most strategic point of the pelvis and using it as a lever. The adjustment, as you will soon see, will momentarily release the pressure off the tight muscles and set them down at the correct angle, thus balancing the entire pelvis.
Examining the Pelvis before the Adjustment
Before you adjust the pelvis, you have to know four things: the correct line of drive; the side of the pain; whether the painful side is high or low; and how to take the SI joint and muscles to tension (loading the joint) before the actual adjustment is delivered.
The Line of Drive
The angle of the horse's SI joint is from the tuber coxae (the point of the hip, "ASIS" in human terms) to the tuber sacrale (the top of the pelvis, "PSIS"). The tuber coxae are large and easy to feel. The tuber sacrales are easy to feel if they're prominent. In a horse, both tuber sacrales are within an inch of each other and come to a point above the first sacral tubercle, forming a hill just cranial (superior) to the rest of the sacrum (See Figure 2.) If you run your hand over that hill, you'll be able to feel both tubers and a depression or split between them. So, starting with the ASIS (which is superior to the PSIS), think of a line running caudally (posterior and medially) toward the tuber sacrale. (Note the direction of the arrow in Figures 1 and 2.)
Figure 1:Points of note on the body of the equine patient.
Figure 2:The equine pelvis: caudal view
Identifying the Painful Side
First, analyze the gait and watch for "hip-hiking" and a "shortened stride." Many factors are responsible for a faulty gait, most of which are not spine or pelvic-related. Stifle pain, hock pain and, most commonly, foot-related disorders are just some of the problems that must first be ruled out before examining the pelvis. Most equine lameness and disabilities start with foot problems and can never be corrected unless the feet are balanced. (Note: There are several types of horse orthotics that are skillfully crafted by experienced shoers [farriers]. The importance of horse orthotics as it relates to the overall health of the horse cannot be overstated. I never fully appreciated the benefits of human orthotics until I started working with horses.)
Assuming that nothing is wrong with the horse's feet and legs, have someone trot the horse away from you, then look at the top of the pelvis (PSISs). Does one side hike up higher with every step? If so, perform step two: Stand on a hay bale (waist-high to the horse's top line), place your pisiform on top of one tuber sacrales, push down (load) and "bounce" the pelvis. Do this for both tubers. Which side of the pelvis rocked less? The one that did is the fixated and painful side. This should correspond to the same side that hiked up when the horse was trotting.
Figure 3:"Bouncing" the equine pelvis to test for the fixed SI joint.
Another way to determine the side of pelvic muscle pain is to compare sacrotuberous ligament tightness. I usually save this information while describing the Logan Basic method, but you can use it here: Stand behind the horse, lift up its tail, and place your thumb at a spot "12 o'clock" to the anus. With your right thumb in place, push up toward the sacral apex until you feel bone. This is one of the first three tailbones. Next, while maintaining light to moderate pressure, tissue pull toward "one o'clock" to the canal until you feel a tight, rubber band-like structure. This is the sacrotuberous ligament. Repeat this procedure with your left thumb on the left side (tissue pulling up to "one o'clock"). The tighter ligament is the side of the sore pelvic and hamstring muscles. (One safety measure: Whenever you stand behind a horse, stack two bales of hay behind the horse's legs in case he decides to kick.)
Determining the High or Low Pelvis
Once you know the side of pain, stand behind the horse and look at the top of its pelvis. Make sure the horse is standing square on even ground. If the right side is sore and the top of the right pelvis looks lower than the left, then you have a low right pelvis! It's as simple as that. Some chiropractors would call the low pelvis the "anterior" pelvis. Just for the record, veterinarians never use the words "anterior" or "posterior." They use "ventral" and "dorsal," respectively.
Taking the Point to Tension and Performing the Adjustment
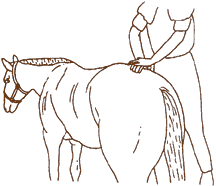
To load and adjust the low pelvis, stand off the side of pain (slightly cranial to the pelvis). Place your contact hand on the tuber-coxae, and your other hand over the contact hand to stabilize. Make sure the fingers of your contact hand are pointing toward the tuber-sacrales, since this is the angle of the SI joint and the thrust. Assume the fencer's stance (with one leg behind you). This will give you the sturdy ground support you'll need when you push into the pelvis. You'll need an assistant to help you load the joint by applying counterpressure on the opposite side of the pelvis. Your assistant also assumes the fencer's stance. You and your assistant are standing oblique to each other: the assistant nearer the back of the pelvis, and you nearer the front (cranial) side of the pelvis. This loads the joint at the proper angle. Direct your assistant to apply firmpressure into your pressure. Maintain this pressure, then deliver a fast impulse. You should notice a ripple effect on top of the pelvis. This ripple effect assures you that you put the pelvis in motion. The entire procedure from loading to thrusting should take only a couple of seconds, since the horse isn't going to stand quiet for too long with both of you pushing! You might want to practice your timing of loading to impulse with a few dry runs.
Figure 4:Performing the adjustment, with an assistant, applying pressure to the front and rear of the equine pelvis, should only take a couple of seconds.
Many relevant diagnostic signs are not performed deliberately by the examiner or by the patient at the examiner’s direction. They are observed as the patient reacts to their condition. Fortin’s finger sign, Minor’s sign, and Vanzetti’s sign are three examples of this principle.
On Feb. 1, 2024, two more legislators – John R. Carter (R-Texas) and Robert “Bob” Good (R-Va.) – co-sponsored the Chiropractic Medicare Coverage Modernization Act of 2023, bringing the co-sponsor total to 155, two more than the total achieved over the entire two-year congressional cycle in which identical legislation last appeared (2021-22).
While working at the Lovelace Medical Center in Albuquerque, N.M., one of the primary care physicians stated that imaging every patient prior to receiving chiropractic was not medically necessary. It was at that point I reconsidered the need for the imaging of every patient to avoid malpractice.